V2Ray + WebSocket + TLS + CloudFlare配置代理
1. 使用docker安装 V2Ray
- 准备工作
- 安装docker
- 找个目录, cd进去, 新建
config.json文件, 写入下列内容
{
  "inbounds": [{
    "port": 10086,
    // 因为还要用 Nginx 反代,这里直接监听本地就行
    // "listen": "127.0.0.1",
    "protocol": "vmess",
    "settings": {
      "clients": [
        {
          // 用户 UUID,自己随机弄一个
          "id": "23ad6b10-8d1a-40f7-8ad0-e3e35cd38297",
          "level": 1,
          "alterId": 64
        }
      ]
    },
    "streamSettings": {
      // 指定底层传输方式为 WebSocket
      "network": "ws",
      "wsSettings": {
        // 在哪个路径上提供 WS 服务,可自定义
        "path": "/whatever"
      }
    }
  }],
  "outbounds": [{
    "protocol": "freedom",
    "settings": {}
  },{
    "protocol": "blackhole",
    "settings": {},
    "tag": "blocked"
  }],
  "routing": {
    "rules": [
      {
        // 默认规则,禁止访问服务器内网
        "type": "field",
        "ip": ["geoip:private"],
        "outboundTag": "blocked"
      }
    ]
  }
}
2. 运行 V2Ray
在1中的文件夹内运行下列命令
docker run -d --name v2ray -v ${PWD}/config.json:/etc/v2ray/config.json -p 10086:10086 v2fly/v2fly-core:v5.4.1 run -c /etc/v2ray/config.json
3. 配置 Nginx
在nginx的配置中添加下列内容
location /whatever {
    proxy_redirect off;
    proxy_http_version 1.1;
    proxy_set_header Upgrade $http_upgrade;
    proxy_set_header Connection "upgrade";
    proxy_set_header Host $http_host;
    proxy_set_header X-Real-IP $remote_addr;
    proxy_set_header X-Forwarded-For $proxy_add_x_forwarded_for;

    set $is_v2ray 0;
    if ($http_upgrade = "websocket") {
        set $is_v2ray 1;
    }

    if ($is_v2ray = 1) {
        # 仅当请求为 WebSocket 时才反代到 V2Ray
        proxy_pass http://127.0.0.1:10086;
    }

    if ($is_v2ray = 0) {
        # 否则显示正常网页
        rewrite ^/(.*)$ /mask-page last;
    }
}
完成后测试
curl -i http://127.0.0.1:10086/whatever
# 400 Bad Request 则为配置成功
4. 配置 CloudFlare
使用cloudflare dns, 并开启dns proxy
完成后测试
# 安装wscat, `sudo npm install -g wscat`
wscat -c wss://example.com/whatever
# Connected (press CTRL+C to quit) 则为成功
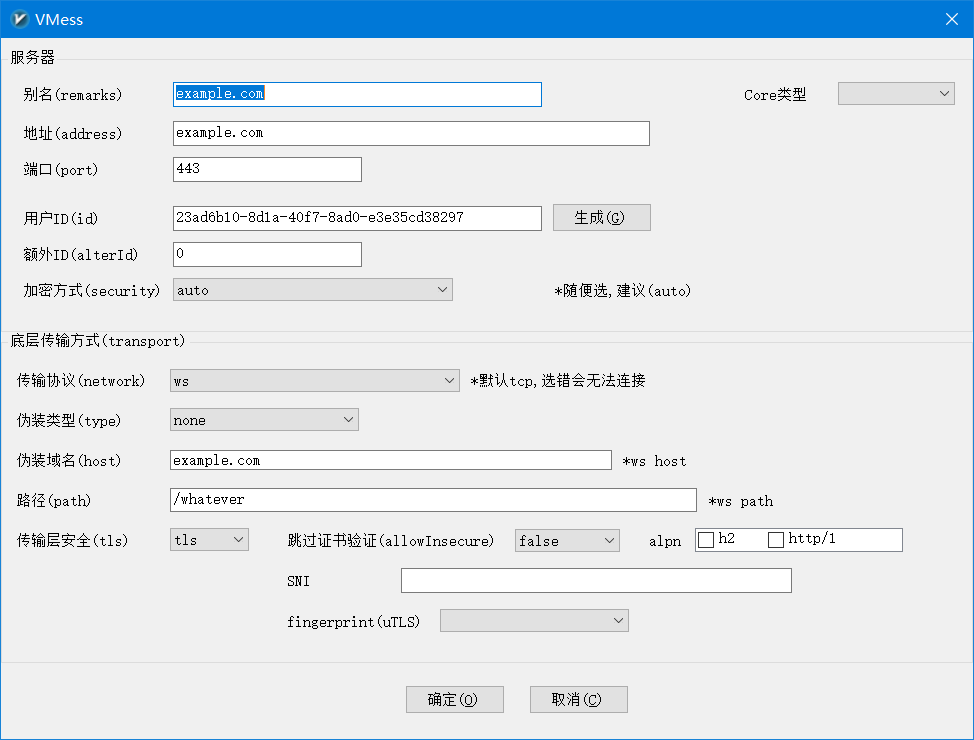
5. 配置 V2RayN 客户端
reference
Updated: 2023-09-02 17:23
Created: 2023-09-02 15:00